How to Change DNS on Different IPTV Devices?
On this page
- How to change DNS on a Samsung Smart TV
- How to change DNS on a Formuler box
- How to change DNS on a LG Smart TV
- How to change DNS on a Sony Smart TV
- How to change DNS on a Apple TV device
- How to change DNS on a iPhone
- How to change DNS on a iPad
- How to change DNS on a Android device
- How to change DNS on a MAG device
In this tutorial, we are going to show you how to change the DNS on your IPTV devices such as MAG, different Smart TV’s, Android and iOS. Changing your DNS settings is usually mentioned as one of the simplest ways to optimize your internet speed and solve many issues you might encounter while streaming IPTV channels. What is Internet streaming?
DNS servers play a major role in IPTV streaming. While there are no mandatory tasks to improve internet speeds, we can make many smaller tweaks and improvements. These improvements work together to increase our overall internet speed and the DNS servers play an essential role. What is IPTV?
Before you change to any DNS addresses, make sure you write down your current DNS address so you can keep these numbers in case you need to get back to your original settings.
If your original settings were set to “Automatic”, just change your DNS settings back to “Automatic”. This applies to all the devices mentioned in this article.
How to change DNS on a Samsung Smart TV
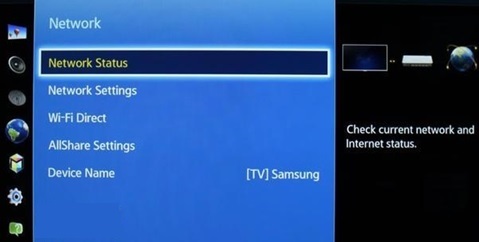
Step 1Press the “Menu” button on your remote control. Under “Settings menu” select “Network” (1) then choose “Network Status”.
Step 2After a few seconds you will see 3 buttons. Select the “IP Settings” and proceed to the next step.
.
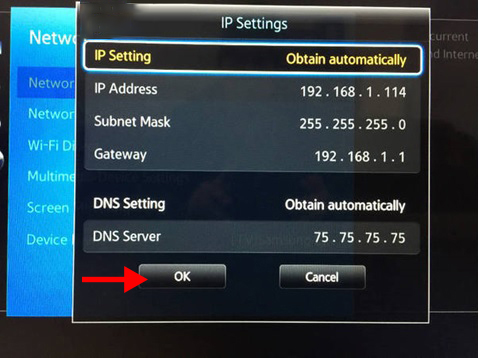
Step 3Choose “DNS setting”. Select “Enter manually”.
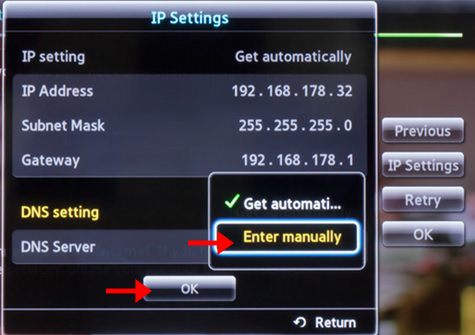
Now enter the below DNS Address and click “Ok“.
DNS Adresses:
Cloudflare DNS: 1.0.0.1 or 1.1.1.1
Google DNS: 8.8.8.8 or 8.8.4.4
Open DNS: 208.67.222.222 or 208.67.220.220
DNS Watch: 82.200.69.80 or 84.200.70.40
Restart your Samsung Smart TV to allow the configuration to take effect.
How to change DNS on a Formuler box
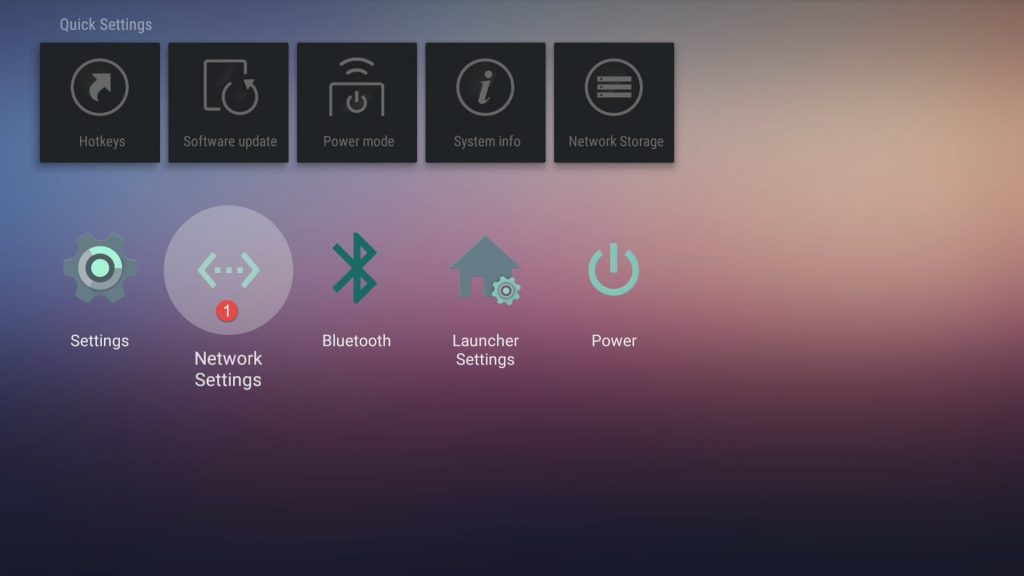
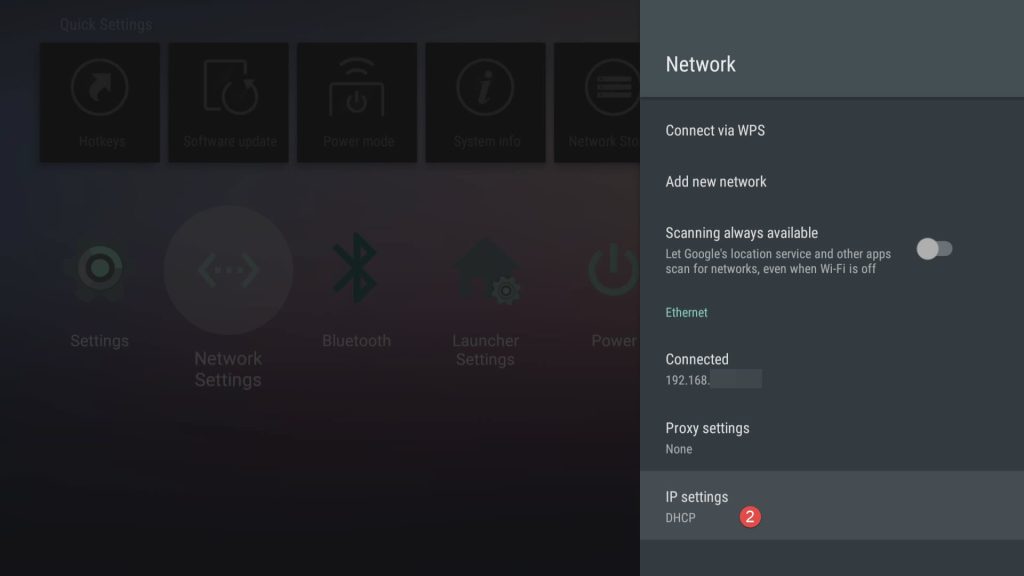
Step 1Go to “Network Setting”.
Step 2Click on “IP settings” .
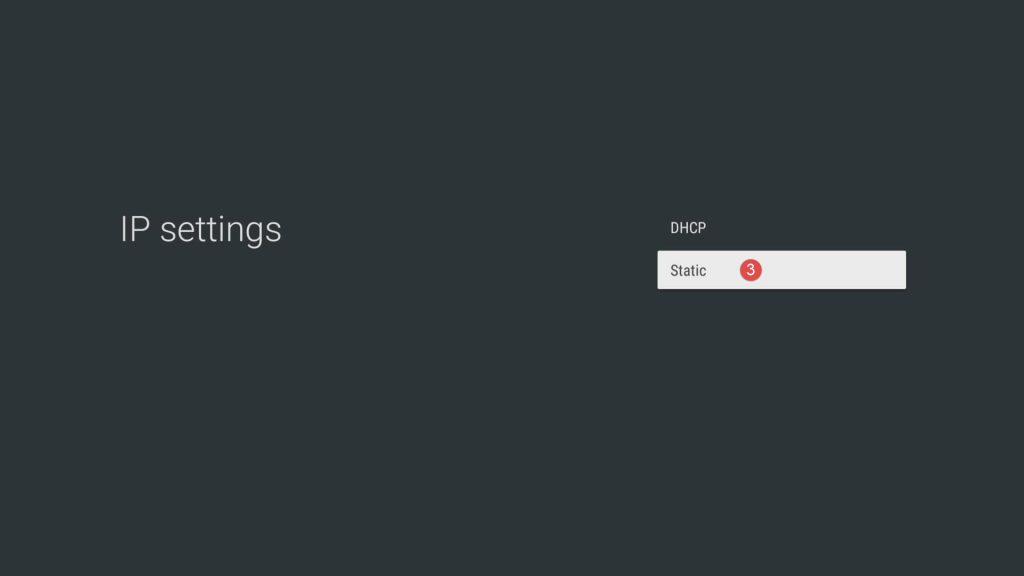
Step 3Then select “Static” .
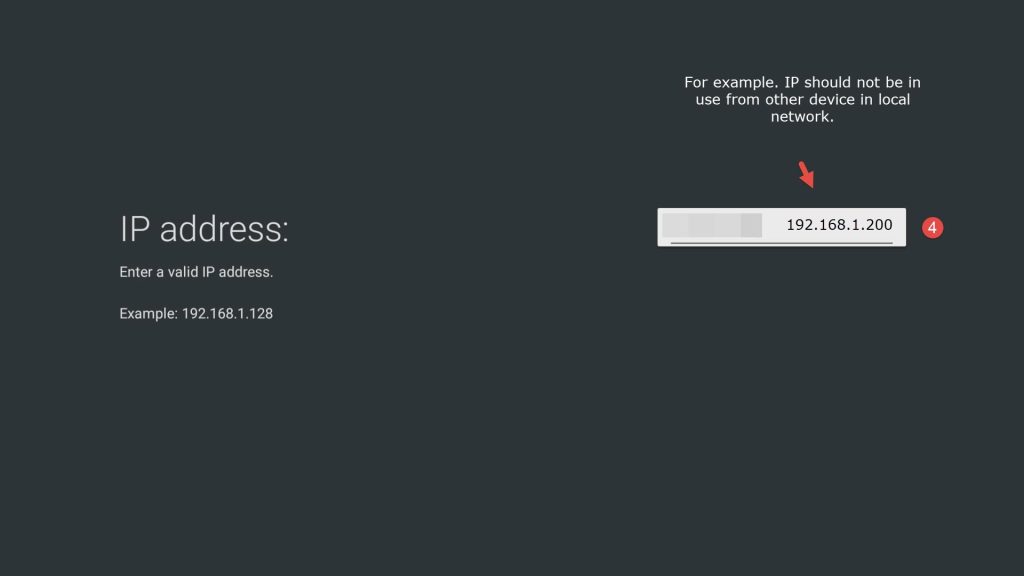
Step 4: In this step enter a valid IP address which not used for other devices in local network Or leave it same as second image below.
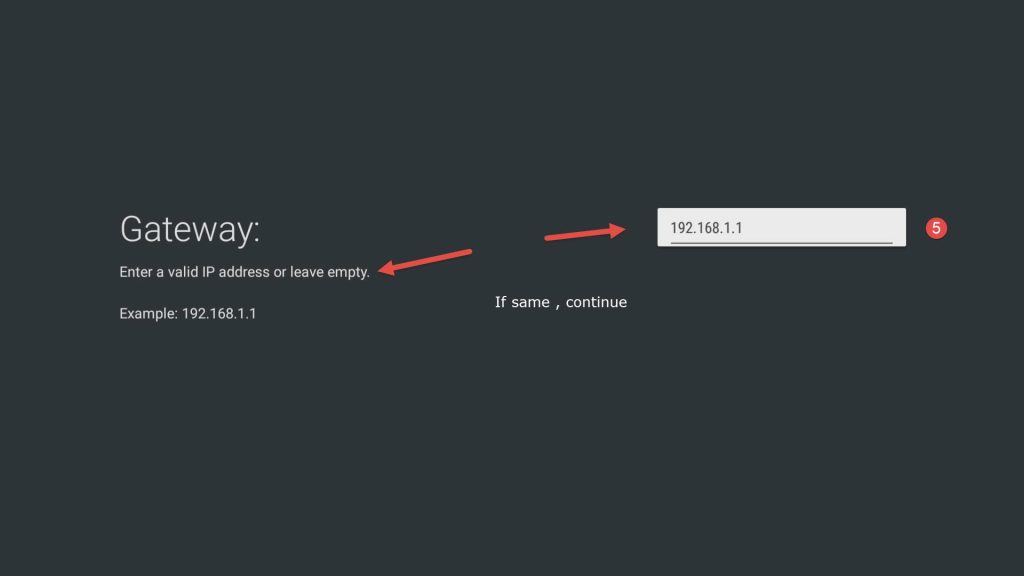
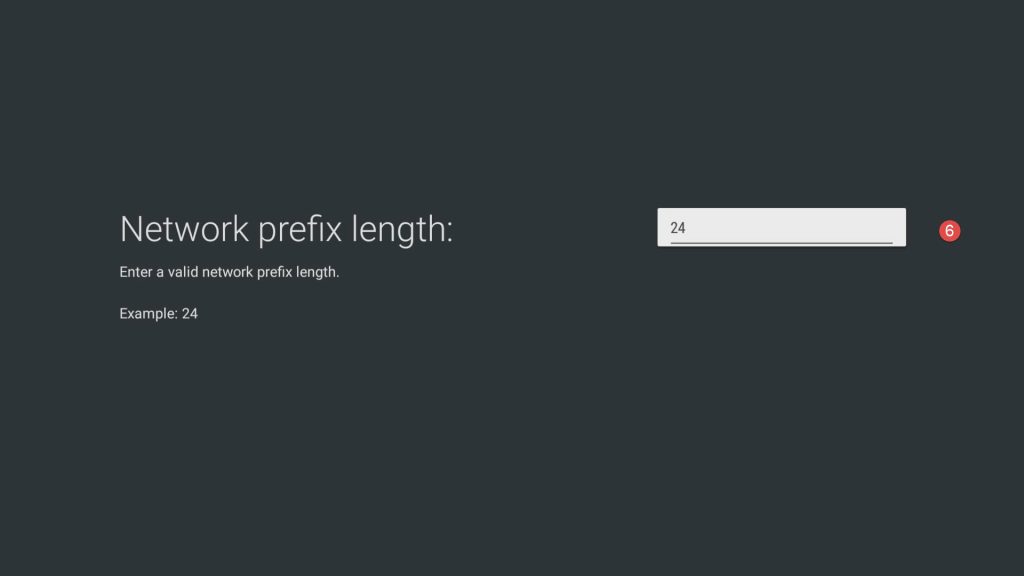
Step 6Enter 24 in this step and skip.
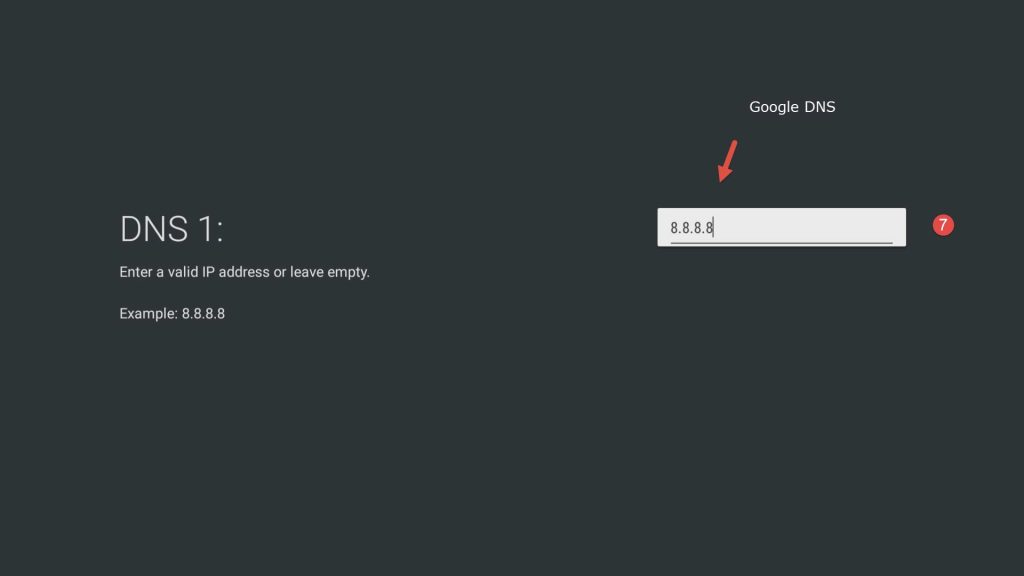
Step 7The important step for us is this step.
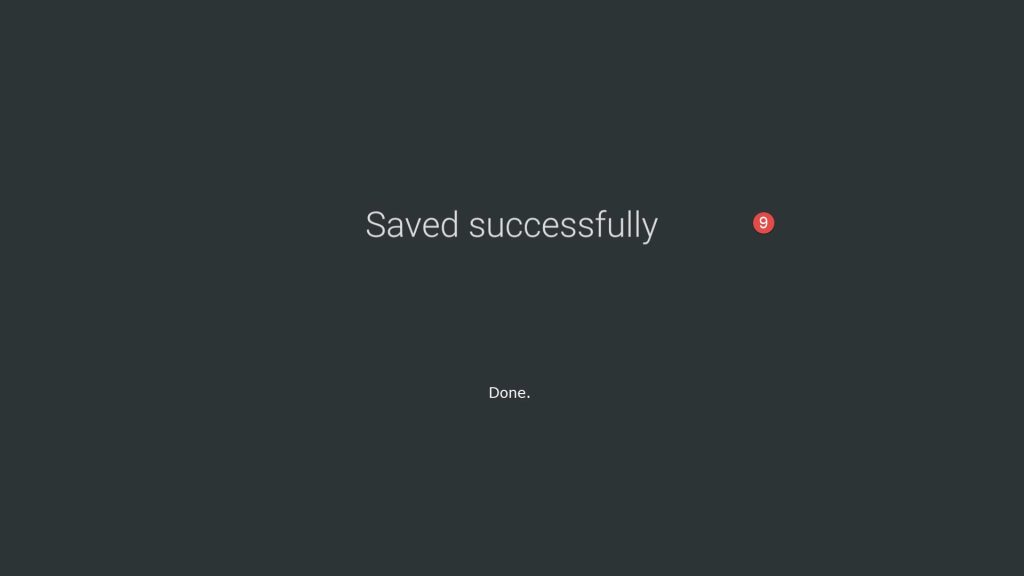
enter one ofthe below DNS Address and Save it.
DNS Adresses:
Cloudflare DNS: 1.0.0.1 or 1.1.1.1
Google DNS: 8.8.8.8 or 8.8.4.4
Open DNS: 208.67.222.222 or 208.67.220.220
DNS Watch: 82.200.69.80 or 84.200.70.40
How to change DNS on a LG Smart TV
Step 1Press the Menu button on your remote control and Select “Settings” and select “All settings”.
.
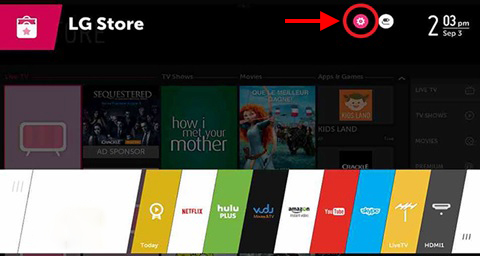
Step 2Scroll down to the “Network” submenu and select “Network Connection” and press on “Set Expert“.
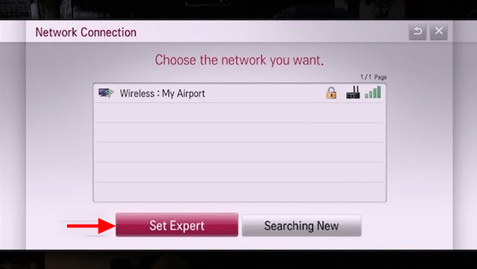
Step 3Under “IP Mode” press “Dynamic”. Under “DNS Server” choose “Manual”.
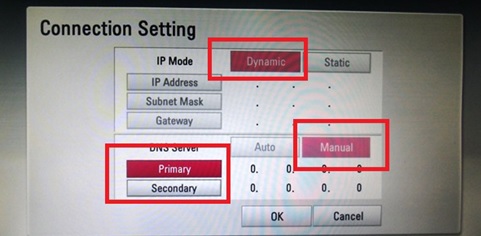
Now enter the below DNS Address and click “Ok“.
DNS Addresses:
Cloudflare DNS: 1.0.0.1 or 1.1.1.1
Google DNS: 8.8.8.8 or 8.8.4.4
Open DNS: 208.67.222.222 or 208.67.220.220
DNS Watch: 82.200.69.80 or 84.200.70.40
Restart your LG Smart TV to allow the configuration to take effect.
How to change DNS on a Sony Smart TV
Step 1Press the “Home” button on your remote. Select Setup and press on Network.
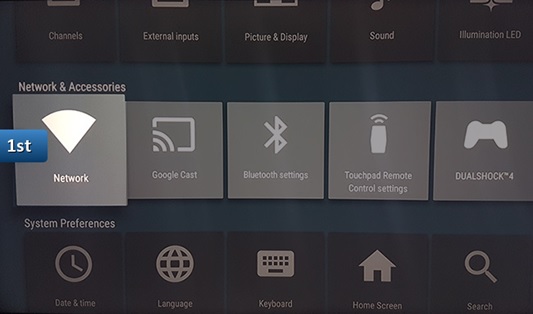
Step 2Press on “Network Setup”.
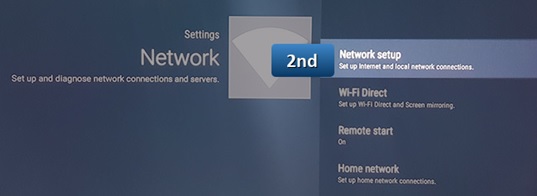
Step 3Select “Expert”.
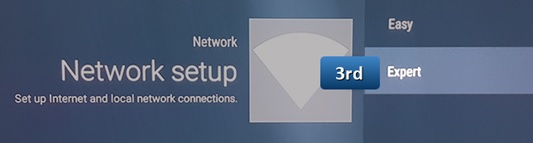
Step 4Choose “Wi-Fi” or “Wired LAN” depending on your connection.
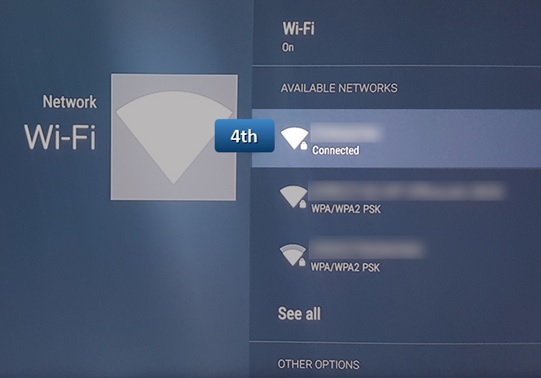
Step 5Chose “Status Info”.
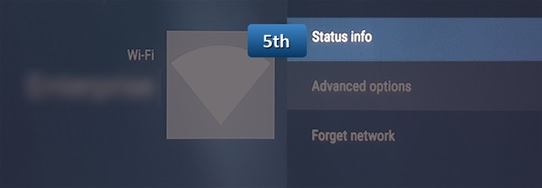
Step 6Write down your”IP address”.
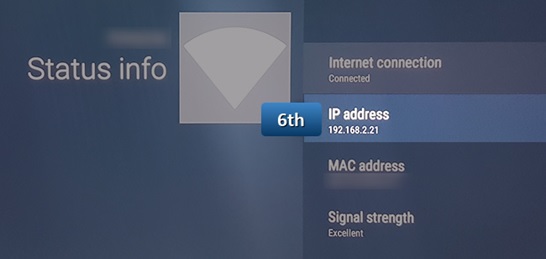
Step 7Go back to network and choose “Advanced options”.
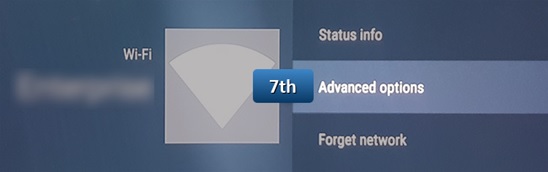
Step 8Press or click on “IP settings”.
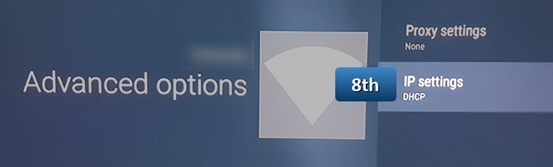
Step 9Now Select “Static”.

Step 10Enter the first three groups of numbers of your IP address. For instance, if your IP address is “192.166.1.1″, enter “192.166.1.”. For the fourth group of numbers, you can enter “50” so the final IP address will look like “192.166.1.50” and click on “Next”
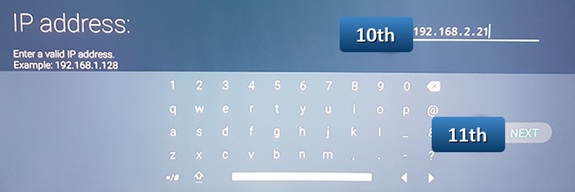
Step 11For the “Gateway” enter the full IP address of your router and click on “Next”.
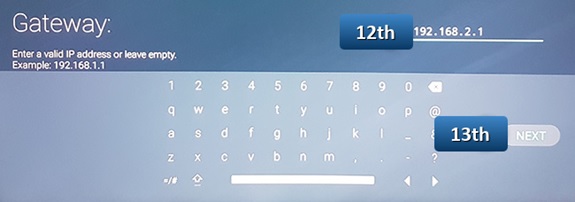
Step 12Enter “24” for the “Network Prefix Length” then click on “Next”.
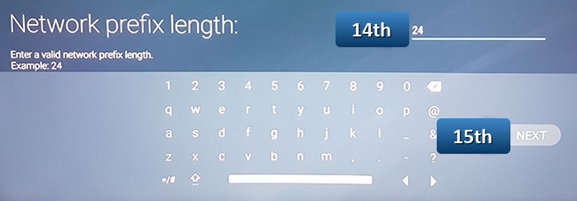
Step 13Enter your Preferred DNS and click on “Next”.
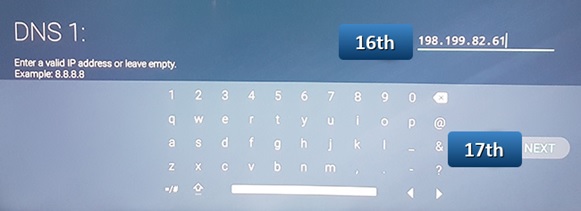
Step 14For DNS 2 enter one of the Alternate DNS addresses and click on “Next”.
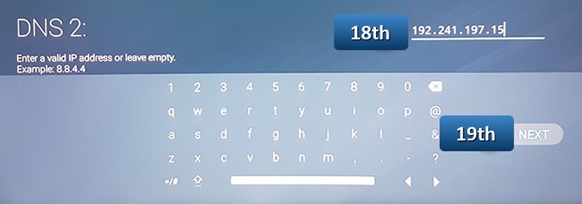
Press “OK” and you are done.
DNS Adresses:
Cloudflare DNS: 1.0.0.1 or 1.1.1.1
Google DNS: 8.8.8.8 or 8.8.4.4
Open DNS: 208.67.222.222 or 208.67.220.220
DNS Watch: 82.200.69.80 or 84.200.70.40
Restart your Sony Smart TV to allow the configuration to take effect.
How to change DNS on a Apple TV device
Step 1Press or click on “Settings” menu on your Apple TV device and select “Network”.
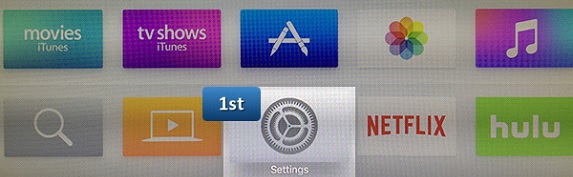
Step 2Now click on the “Network”.
.
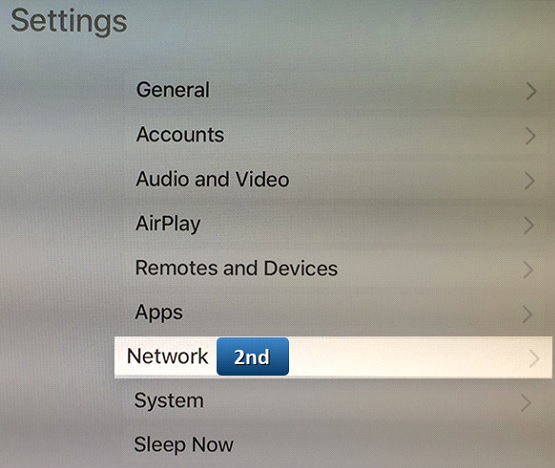
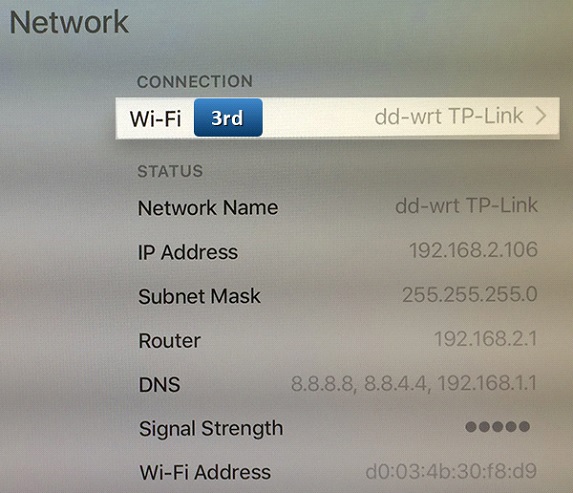
Step 3Click on “Wi-Fi”.
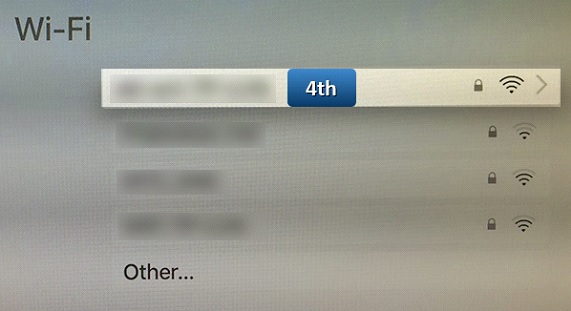
Step 4Choose your Wi-Fi Connection.
Step 5Scroll down and select “Configure DNS” option.
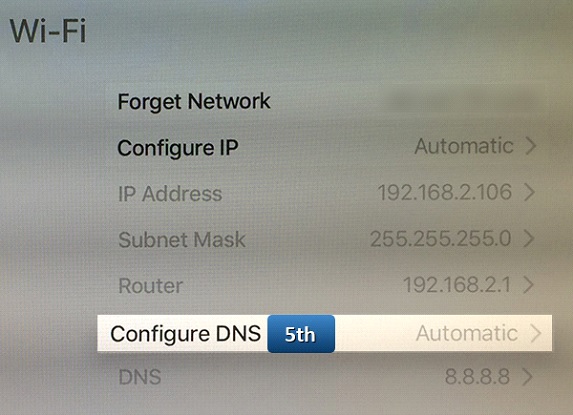
Step 6Choose “Manual” when you are asked to choose between Manual or Automatic.
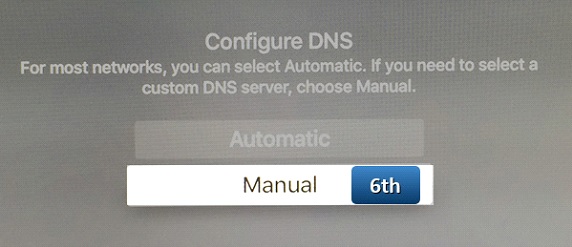
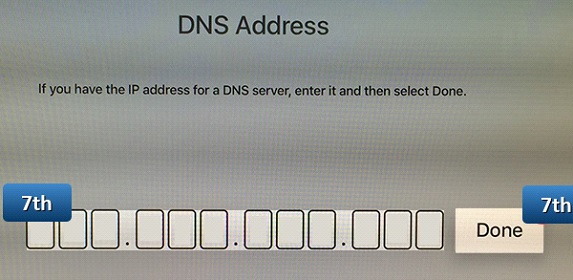
Step 7In the DNS field pls enter the DNS Server address. Important! You should enter 3 digits for each cluster.
I.E. for DNS 1.11.111.123 you should enter 001.011.111.123. Click “Done”
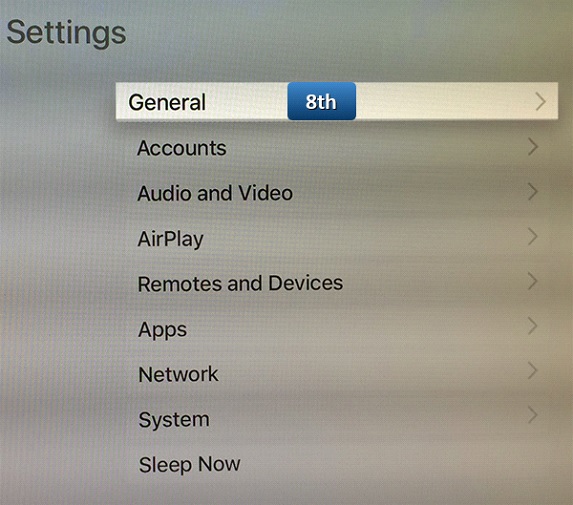
Step 8Your Smart DNS is set up, nearly done, For that, go back to “Settings” and select “General”.
Step 9Find the “Region Format” option and press on it.
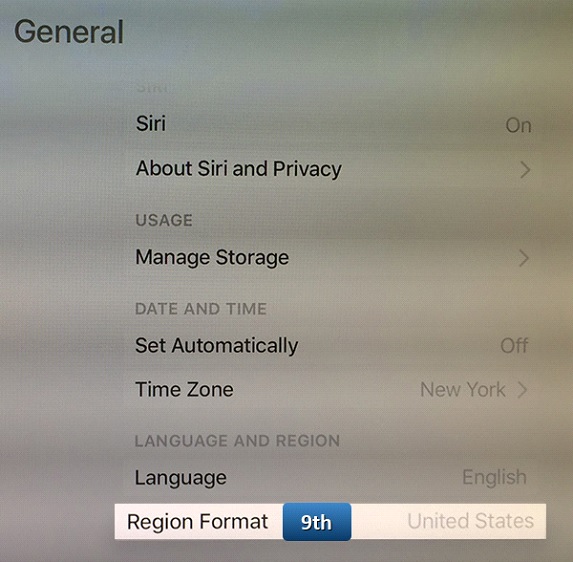
Step 10Select for Example “The United States” from the list of options.
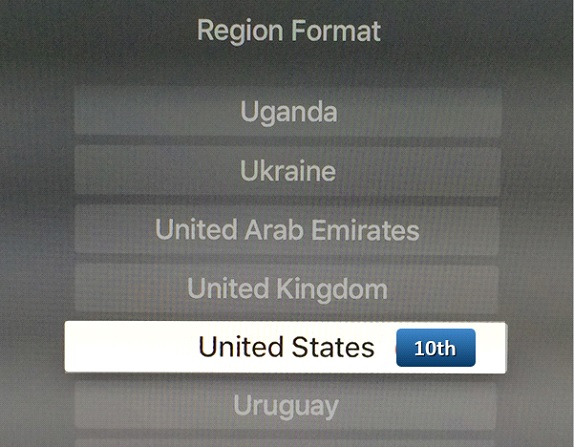
Go back to the main screen and select “Settings”. Use the “Sleep Now” command.
Unplug the Apple TV power cord and wait 10 seconds. Then plug the Apple TV back in.
DNS Addresses:
Cloudflare DNS: 1.0.0.1 or 1.1.1.1
Google DNS: 8.8.8.8 or 8.8.4.4
Open DNS: 208.67.222.222 or 208.67.220.220
DNS Watch: 82.200.69.80 or 84.200.70.40
Restart your Apple TV to allow the configuration to take effect.
How to change DNS on a iPhone
Step 1Go to “Settings”.
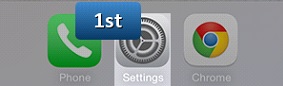
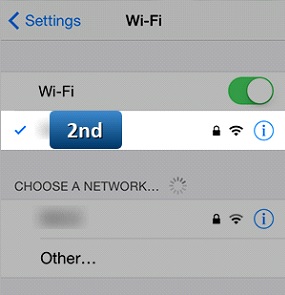
Step 2Choose the network that you are using.
Step 3In the DNS field enter the DNS Server addresses.
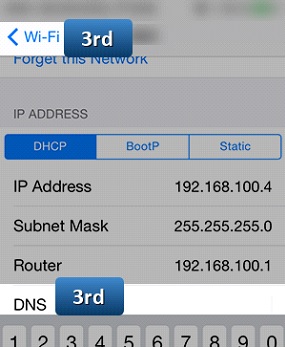
DNS Addresses:
Cloudflare DNS: 1.0.0.1 or 1.1.1.1
Google DNS: 8.8.8.8 or 8.8.4.4
Open DNS: 208.67.222.222 or 208.67.220.220
DNS Watch: 82.200.69.80 or 84.200.70.40
Step 4Go back to Wi-Fi to save your changes.
How to change DNS on a iPad
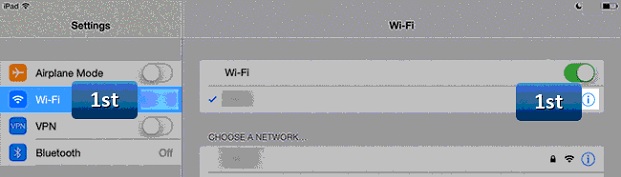
Step 1Go to your iPad settings. Now click on “Wi-Fi” and select the network you are connected to.
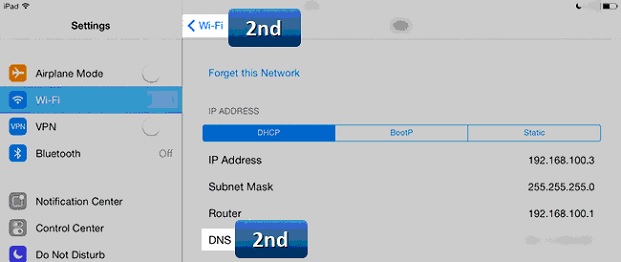
Step 2In the DNS field enter the DNS Server address. Tap on “Wi-Fi” from the upper left corner to save your settings.
DNS Addresses:
Cloudflare DNS: 1.0.0.1 or 1.1.1.1
Google DNS: 8.8.8.8 or 8.8.4.4
Open DNS: 208.67.222.222 or 208.67.220.220
DNS Watch: 82.200.69.80 or 84.200.70.40
Step 3Go back to Wi-Fi to save your changes.
How to change DNS on a Android device
Step 1Go to “Settings”.
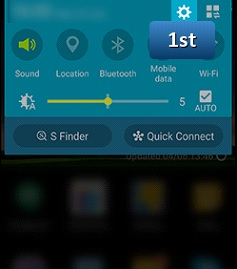
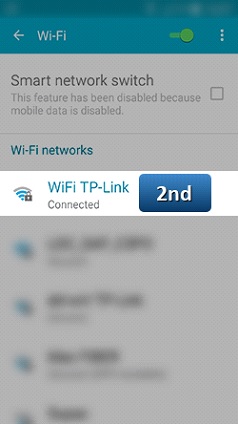
Step 2Select “Wi-Fi” and Press and hold active wireless network until a dialog pops up.
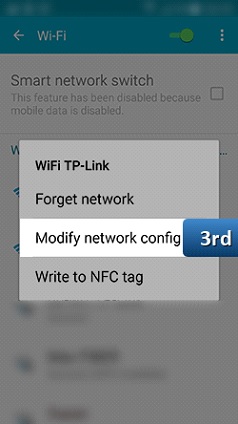
Step 3Press on “Modify network config”.
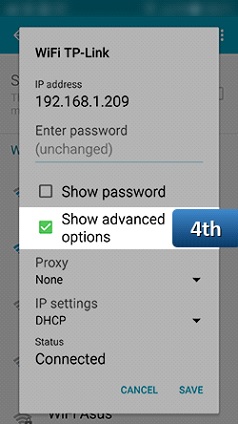
Step 4Check “Show advanced options”.
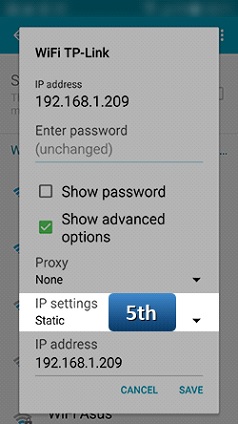
Step 5Change “IP settings” to “Static”.
.
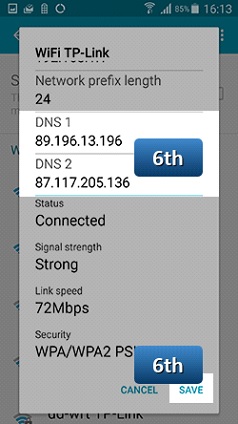
Step 6In the “DNS 1” and “DNS 2” fields enter the DNS Server address and Press on “Save”.
DNS Addresses:
Cloudflare DNS: 1.0.0.1 or 1.1.1.1
Google DNS: 8.8.8.8 or 8.8.4.4
Open DNS: 208.67.222.222 or 208.67.220.220
DNS Watch: 82.200.69.80 or 84.200.70.40
Restart your device and Enjoy.
How to change DNS on a MAG device
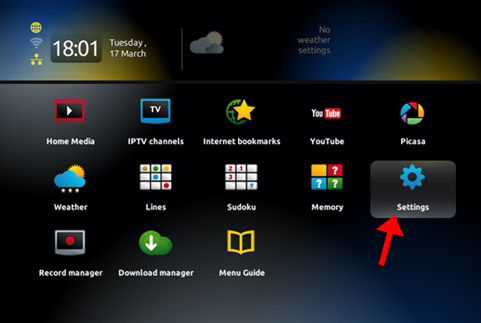
Step 1Go to “Settings”.
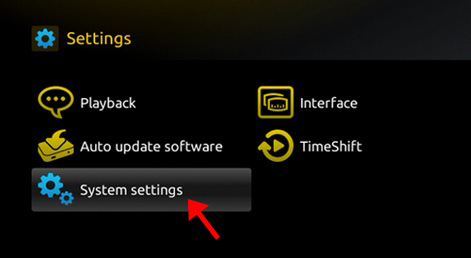
Step 2Now select “System Settings”.
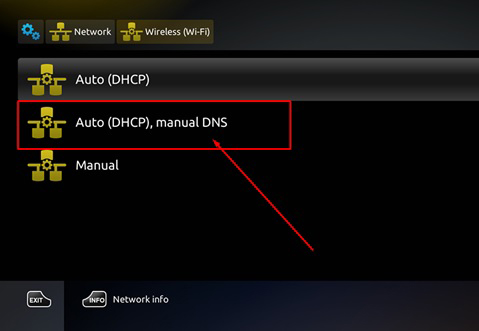
Step 3Now choose Network and press on “Auto (DHCP), manual DNS“.
DNS Addresses:
Cloudflare DNS: 1.0.0.1 or 1.1.1.1
Google DNS: 8.8.8.8 or 8.8.4.4
Open DNS: 208.67.222.222 or 208.67.220.220
DNS Watch: 82.200.69.80 or 84.200.70.40
Restart your device and Enjoy.
Let us know in the comments section below about your opinion and feedback concerning this article. Thank you in advance.
Did this guide work for you?
Thanks — your feedback helps us keep this guide accurate.